MIDI_CAN
05 May 2020 - Jake Sherwood
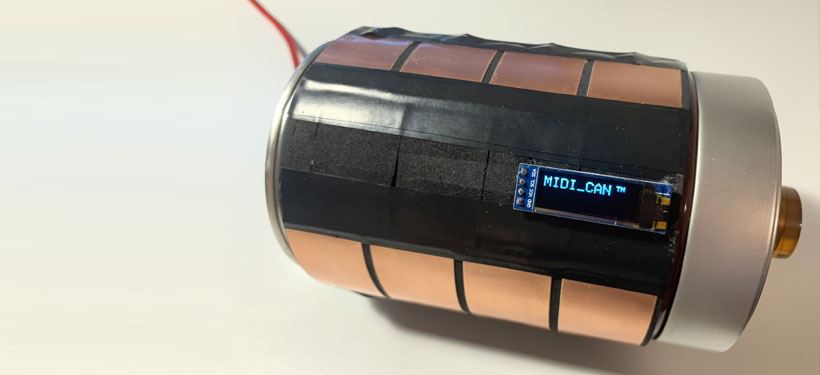 the MIDI_CAN
the MIDI_CAN
The MIDI_CAN is a networked, multimode, instrument / MIDI controller.
Created with Noah Kernis, The MIDI_CAN is designed to be used with one or more musicians / devices. The MIDI_CAN can be played by itself or collaboratively over the internet.
With the pandemic and the new socially distant world we find ourselves in, we are now more separated than ever. We wanted to make something to connect us, even though we are miles apart.
Facing mandatory stay at home orders what can we do to continue our collaborative nature? How can we still connect even though we can’t physically?
Music has that power and we wanted to make that a part of this project.
MIDI_CAN Collaborative Music Exploration
Using Arduino, NodeJS, MIDI, UDP, and your DAW of choice, the MIDI_CAN connects us in these new strange times.
With an Arduino Nano 33 IoT, an 8 sensor capacitive touch array and a rotary encoder, the MIDI_CAN allows for multiple input modes.
Sending MIDI signals to your DAW, it is also broadcasting and listening for incoming MIDI commands over UDP. A locally hosted Node server sends and receives UDP signals over the internet to play with others. Predetermined network configuration allows for easy transmission of signals across the web.
Ultimately network configuration settings will affect each musician’s music environment. A user’s unique IP address, broadcasting port, and trace route will adjust various settings ranging from bpm, key, and other MIDI controllable values. *Note this feature is currently still under development.
Customizable modes and channel setup allow us to tailor to the device to our own preferences.
With limited resources the MIDI_CAN was built with kitchen fabrication at its core. Using an Illy’s coffee can as the enclosure, it’s both robust and ergonomic. Wrapped in rubber foam to provide capacitance insulation, and stuffed with a microcontroller and circuit, the MIDI_CAN has a very balanced feel in hand.
Using custom capacitive sensors the MIDI_CAN delivers a distinctive playing experience.
Four dedicated capacitive buttons can be combined with 4 capacitive slide inputs to create unique and interesting sounds.
The MIDI_CAN provides a variety of modes: explore mode, channel select, chords, scales, sample glitching / volume adjustment, and broadcasting.
MODES
1) Explore Mode: allows you to play individually configured channels in the DAW. The 4 capacitive button inputs are used to play notes controlled by the encoder. The 4 capacitive slides allow for a range of notes to be played.
2) Channel select mode: allows for channel selection for use in scale mode.
3) Chords mode: The four capacitive buttons play chords in the scale of C major, the slides pitch bend.
4) Scales: 8 capacitive inputs play notes of a preprogrammed scale
5) Scales w/ pitch bend: The four capacitive buttons play scale notes, the slides pitch bend.
6) Slides as slides or notes: The four slide inputs can be set to play a range of notes or a set not determined by the encoder values.
7) Pot mode: switches encoder to act as a potentiometer to scroll through audible not ranges. For use with Explore mode.
8) Glitch mode: Glitch between samples and adjust volume captured samples or pre loaded samples. *Note this feature is currently still under development.
9) Sample mode: Record and loop samples of progressions just played *Note this feature is currently still under development.
10) Broadcast mode: Select which channels to Broadcast
11) Calibration Mode: on startup, the can goes through a calibration process to set min and max capacitance for all sensors as well as the can.
Fabrication Process
With limited resource we pushed through with kitchen fabrication. Inspired by my last purchase of coffee beans, we decided to use an Illy’s coffee cans as our enclosure.
Wrapping the can in foam tape allowed for enough insulation for the capacitance from just holding the can not to trigger the sensors erratically. To dial things in even further we set can capacitance and buffer thresholds during the calibration process.
We used capacitive copper tape for our custom sensors and a rotary encoder out of the top of the can for mode selection, channel selection, and adjusting note values in “potentiometer” mode.
The usb power cable comes out of the bottom of the can.
After a few rounds of prototype fabrication it was time to do the full fabrication, which essentially meant destroying to already working device. In prototyping, all wires were attached to the sensors on the outside of the can with electrical tape. We wanted everything to be internally wired. This meant taking everything apart… which was extremely nerve racking.
Cutting holes in the can and soldering to the copper were especially stressful. It was all working previously, fingers crossed it will work again.
I used a combination of small nails and drill bits to make my holes. Testing on a back up can first, I found that drilling plus having additional rubber foam on the inside of the can produced the least blow out.
To smooth things out in the end I used a Dremel to sand down the rough edges.
Fabrication - wrapping and applying sensors
Fabrication - internally wiring and soldering sensors
 drilling holes with foam tape
 drilling holes blowout
 drilled holes blowout vs dremeled
Fabrication - luckily she came back to life after deconstruction
Electronics, Code, and Schematics
Building our own capacitive sensors was a fun process. Tt took some time to understand the send and receive schematic but this video helped clear things up.
We still plan to figure out how to make the sensors work linearly as well as adding some multi-touch functionality.
Multi-touch functionality would make for much easier music play, by limiting the need to use the rotary encoder.
We also faced some responsiveness issues with the sensors which seemed to be exaggerated depending on what instruments we had set up in the DAW. As we continue to work on this we’re going to try to resolve that as well.
The rotary encoder gave us another input and allowed for mode selection and acts as a potentiometer in explore mode.
As we work on this further we hope to add functionality to engage “as pot mode” automatically when in explore mode and with a capacitive reading over a certain threshold.
We used a number of libraries to put this whole thing together.
#include <CapacitiveSensor.h> 		//capacitive sensors
#include <Wire.h>			// OLED
#include <Adafruit_GFX.h>		// OLED
#include <Adafruit_SSD1306.h>		// OLED
#include <Encoder.h> 			// rotary encoder
#include <WiFiNINA.h> 			// connect to local wifi network
#include <Arduino_JSON.h> 		// parse JSON header file w/ config settings from API
#include <WiFiUdp.h>  			// send UDP over wifi
#include <MIDIUSB.h> 			// send MIDI over usb
#include <pitchToNote.h> 		// pitch to note conversion for MIDI
All code for the Arduino and the Node servers can be found here on GitHub.
The MIDI_CAN use two or more local network NodeJS servers to send and receive data across the internet. Currently using UDP we make look into transitioning to web sockets in the future.
We started with UDP, as our initial concept was to do it all from the Arduino but we eventually decided to off load some computation.
In our tests we were running the servers on our laptops but they could easily be set up to run on a Raspberry Pi.
A lot of time was spent refining the cap sensor calibration code. Writing code in a more succinct way, using for loops and arrays, helped reduce the amount of lines needed.
One component we didn’t complete was programming the OLED to display calibration data and mode and channel data. This will be great to add but was not needed for final presentation. The serial monitor worked just fine.
Many of our working working / development sketches can be found in the r_and_d directory on GitHub.
Schematics
 MIDI_CAN Breadboard Layout
 MIDI_CAN Schematic
Network
Passing MIDI via UDP over the internet was added an additional layer to this project.
Noah did a great job getting us connected and set up this fun web config API. Allowing us to confirm connecting settings and adjust capacitance buffer etc.
 MIDI_CAN Web Config
We plan to add further functionality to the API.
We also did not get to tying in the network data to alter each individual user’s music environment.
This was a fundamental part of the original concept and stil on the todo list as we continue working on The MIDI CAN.
Music
Having some minor musical background (I can play a thing or three on a guitar) exploring DAWs was a whole new thing for me. Logic is an emense program and we both spent a lot of time exploring what options we had to do what we wanted.
Only scratching the surface of what is possible, I think we got to a decent place of being able to make somethings that sound like music.
Working with a combination of included and found sample tracks as well as software instruments from Logic that are set with infinte sustains we were able to create some interesting compositions.
Still on the todo list is a way to record/sample some of those progressions and loop them to continue to build on top of them.
I think adding that feature will really help the MIDI_CAN shine as an MIDI instrument.
I think another break through feature was adding the ability to play chords. Currently configured to play in the key of C major with C, F, G, & Am chords, adding chords produced a really nice full sound.
Here are a few recordings of us playing around with sound.
MIDI_CAN MUSIC
Summary
Overall we’re very please with how this project turned out. Especially given the current circumstances. Working with Noah was great and to no surprise to either of us we both brought value input and feedback to all aspects of this project.
We both want to continue to work on this and iterate both on the design and functionality.
We’re also working on a submission for the Network Music Festival.
Things still on the list:
1) Finish OLED
2) Network data modifying music environment
3) Glitchy music / volume on off mode
4) Sampler / looper mode
5) Figure out how to have both linear & nonlinear slide sensors
6) Improve responsiveness of capacitive sensors
6) Add auto “encoder as pot” in explore mode when a cap reading is over a threshold
7) Remove channel select mode and just have it be in each mode like chords & broadcast
8) Clean up UDP serial monitor prints to be able to better see modes etc
9) Customize modes, channels and placement from API
PHoto Gallery
 01_encoder_impalement_hazzards_of_fabrication
 02_prototype_vs_final_sensors
 03_testing_new_cap_sensors
 05_capacitive_sensors
 06_prototyping_making_holes_in_the_can_inside
 07_prototyping_making_holes_in_the_can_outside
 08_prototyping_making_holes_in_the_can_OLED_hole
 09_prototyping_making_holes_in_the_can_OLED_placement
 10_prototyping_making_holes_in_the_can
 11_prototyping_OLED_supoort
 12_prototyping_OLED_supoort_on_can
 13_prototyping_dremeled_holes
 14_prototyping_dremeled_holes_vs_not
 15_prototyping_usbplug_hole_hammer
 16_prototyping_usbplug_placement
 17_prototyping_usbplug_interior
 18_prototyping_usbplug_interior_2
 19_prototyping_usbplug_with_plug
 20_building_breadboard_support_in_can_1
 21_building_breadboard_support_in_can_2
 22_building_breadboard_support_in_can_3_velcro_attachement_1
 23_building_breadboard_support_in_can_4_velcro_attachement_2
 24_building_breadboard_support_in_can_5_velcro_attachement_3
 25_building_breadboard_support_in_can_6_combined_1
 26_building_breadboard_support_in_can_6_combined_2
 27_building_breadboard_support_in_can_6_combined_3
 28_building_breadboard_support_in_can_interior
 29_building_breadboard_support_in_can_components
 30_capacitive_sensor_copper_tape
 31_capacitive_sensor_solder_test_01
 32_capacitive_sensor_solder_test_02
 33_capacitive_sensor_solder_test_03
 34_capacitive_sensor_solder_test_04
 35_capacitive_sensor_solder_test_05
 36_capactive_sensor_with_removed_tape_attempting_to_reuse_buttons
 37_capactive_sensor_with_removed_tape_attempting_to_reuse_slides
 38_drilling_holes_in_can_with_foam_tape
 39_drilled_holes_in_can_blowout_1
 40_drilled_holes_in_can_blowout_2
 41_drilling_holes_in_can_usbpug
 42_drilled_holes_in_can_usbpug_could_be_cleaner
 43_damaged_cap_sensor
 44_replaced_all_cap_sensors
 45_started_protective_wrapping_sensors_while_fabbing
 46_drilled_holes_dremeled_vs_not
 47_drilled_holes_dremeled
 48_rotary_encoder_in_can_lid_topview_with_goes_to_eleven_nob_1
 48_rotary_encoder_in_can_lid_topview_with_goes_to_eleven_nob_2
 48_rotary_encoder_in_can_lid_underside
 49_OLED_placement_1
 50_OLED_placement_2
 51_OLED_placement_3_wiring
 52_OLED_placement_4
 53_senso_solder_prep_1_fished_wires_from_inside_can_with_nail
 54_senso_solder_prep_2_wires_ready_for_solder
 55_senso_solder_prep_2_wires_soldered_1
 56_senso_solder_prep_2_wires_soldered_2
 57_senso_solder_prep_otherside_lots_of_wires
 58_senso_solder_complete_inside_1
 59_senso_solder_complete_inside_2
 60_OLED_placement_secured_with_hot_glue_5
 61_usb_plug_installed
 62_OLED_sensors_wires_and_can
 63_OLED_sensors_wires_and_can_with_breadboard
 64_OLED_sensors_wires_and_can_with_breadboard_and_lid
 65_breadboard_tangle_01
 66_doesnt_fit_Usb_too_wide_off_the _side_breadboard_tangle_02
 67_disassembly_take_5
 68_thats_better_it_fits
 69_breadboard_less_tangle_01
 70_breadboard_less_tangle_02
 71_breadboard_less_tangle_03
 72_breadboard_wire_mgmt_01
 73_breadboard_wire_mgmt_02
 74_breadboard_wire_mgmt_03
 75_breadboard_support_installed
 76_midi_can_all_closed_up
 78_the_midi_can_01
 79_the_midi_can_02
 80_the_midi_can_03
 81_the_midi_can_04
 82_the_midi_can_05
 83_the_midi_can_plenty_of_room_in_there
 84_the_midi_can_06
 85_the_midi_can_07
 86_the_midi_can_08
 87_the_midi_can_09
 88_the_midi_can_10
 89_the_midi_can_11
 90_the_midi_can_12
 midi_can_breadboard_bb
 midi_can_breadboard_schem


