ExposéHID
23 Mar 2020 - Jake Sherwood
 ExposéHID
ExposéHID
ExposéHID (Human Interface Device.)
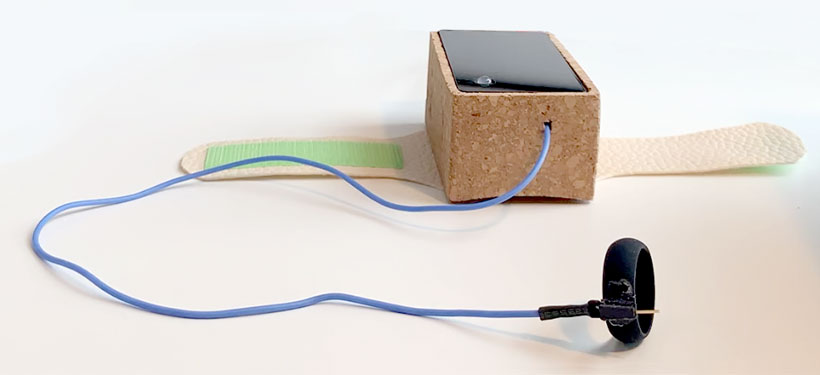
ExposéHID is a gesture device to control common Mac OS X Exposé functions. ExposéHID uses the Arduino 33 IoT’s integrated IMU to control certain modes based on the user’s gestures.
ExposéHID has 5 modes: sleep (on/off with capacitive ring button), tab through open apps (gesture left), show all open docs in a specific app (gesture up), show all open apps and docs (gesture down), and open Launchpad (gesture right).
In certain modes ExposéHID will switch to mouse mode to allow the user to navigate and make a selection with the mouse.
ExposéHID Video
For our HID assignment I tried to think of things I do most often in my workflow. Utilizing these Expose features is something that kept coming up. It seemed like a good fit for something to control with the keyboard.h and mouse.h libraries and I was excited to use the Nano’s IMU.
What is Expose on Mac?
Exposé is an awesome feature of the Mac OS X user Interface that makes it easy to see, access, or hide application windows and documents. It’s a great feature to help you work with the clutter that tends to build up when you are using multiple applications and/or documents. Find it Fast.
(source switchtoamac.com I know this site is super old lol)
Biggest Learnings and Gotchas:
I learned a lot and had some major gotchas on this project… for one it all culminated right when Convid-19 really hit the fan and ITP went virtual… severely limiting access to the typical fabrication resources.
Fortunately, I was able to get some last minute fab’ing done and was able to CNC my enclosure and laser cut my top panel before we lost access to the shop.
I had never used the IMU on the Nano so that was something completely new. I was happy to find it was relatively easy to get basic example code up and running.
One of my biggest coding struggles was my own internal crosswire of trying to use the actual accelerometer values to control the direction of my mouse. Once I realized I should just look for changes and thresholds that part of the code worked out much easier.
I also struggled with the “tab thru apps” mode. In my original version, you gestured left and enter that mode and as long as you keep the device to the left it would scroll left. Turning back right would / should have selected the app you wanted. This had two problems: 1) it took a real long time to get to the app on the other side from where you started (you couldn’t go right) 2) turning back right had to be timed perfectly and most often the next app was accidentally selected.
Once I got the capacitive touch ring added in I realized I could also use that as a switch / button. So I reworked the “tab thru apps” mode to allow scrolling both directions and then used the ring button to select the desired app.
I also had a few gotcha moments with the RGB LED. I had never used one of those either and I purchased common anode leds. Come to find out the common anode leds need reverse of the typical led on / HIGH call. They want LOW to enable the LED and HIGH to turn it off. Fortunately this new found virtual world on Discord helped me debug my issue virtually. Which was actually pretty cool and a bit of a resource we didn’t have before.
I also had some fabrication issues, due to lack of shop access.
1) Broke a piece off my cork enclosure. superglue to the rescue.
2) Acrylic panel didn’t quite fit right due to led placement. Would have cut a new one if I had a laser… but it did allow for more of a friction fit lol
3) Velcro was superglued, originally planned to sew it on. Superglue actually worked really well though
4) Over all I would have liked my enclosure to have been smaller. If I had had the resources to mill another enclosure I would have redone my proto board to be shorter. I used header pins so I could easily remove the Arduino and motor driver. But I could do it without the headers and it would have been much shorter.
How to:
1) Gather Materials (see Bill of Materials Fig. 1)
2) Wire up proto board following breadboard / schematic (Fig. 2 & 3)
3) Build 3D model and CNC enclosure - used VectorWorks, Rolland Viewer and Modela Pro (enclosure vwx)
4) Laser cut acrylic top panel - used VectorWorks & Adobe Illustrator (enclosure top panel vwx)
5) Cut out wristband from template align binding post holes with inner template - used Adobe Illustrator (wristband template & inner template)
6) Attach velcro to wristband (due to lack of shop it was superglued)
7) Attach wristband to enclosure with binding posts (see video)
8) Attach conductive material to silicon ring. In this case I used a header pin that was superglued on.
9) Attach acrylic top panel to enclosure with carpet tape or similar. (*note ended up with friction fit due to the issues mentioned above.)
10) Download code from Github and upload to Arduino
Fig. 1 ExposéHID - Bill of Materials
 Fig. 2 ExposeHid Breadboard
 Fig. 2 ExposeHid Schematic


